Garlic Butter Baked Chicken Breast
Introduction
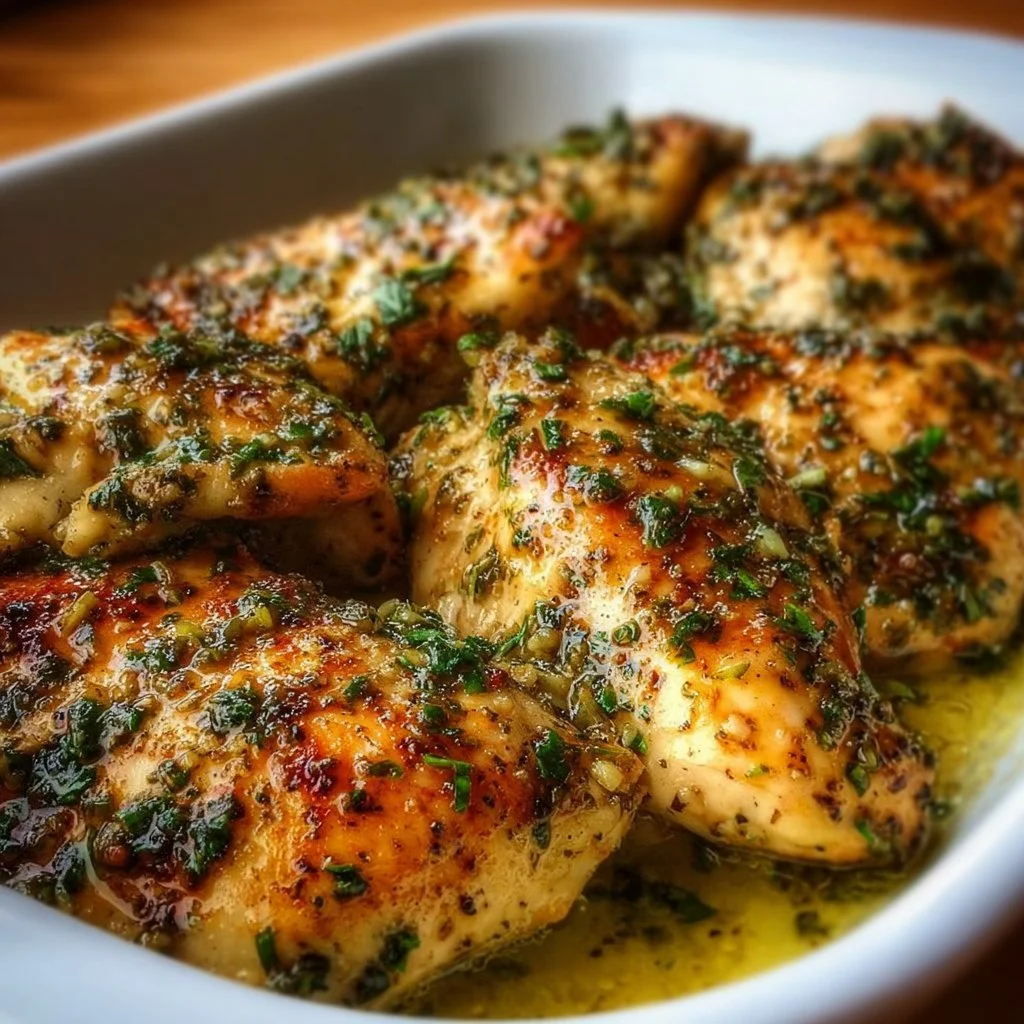
This Garlic Butter Baked Chicken Breast is a simple, satisfying weeknight meal that fills the kitchen with warm garlic and browned butter aromas. The chicken comes out tender and juicy from a gentle bake, with a glossy garlic butter coating that adds a rich, savory mouthfeel. The paprika gives a subtle smoky warmth and the chopped parsley adds a bright, fresh finish. This dish is ideal for busy evenings, meal prep, or a cozy dinner served with a side salad or roasted vegetables. If you want to use the same garlic butter flavor in a handheld meal, try it in a wrap variation like Cheesy Garlic Chicken Wraps, where the buttery garlic tastes great wrapped with greens and cheese.
Ingredients
- 4 chicken breasts, boneless and skinless — standard single-portion breasts, trimmed of excess fat for even cooking.
- 4 tablespoons butter — provides richness and helps carry the garlic flavor; use unsalted if you prefer to control salt. Try a cheesy chicken and garlic wrap for a tasty leftover idea.
- 4 cloves garlic, minced — fresh garlic gives the best aroma and bright, pungent flavor.
- Salt and pepper to taste — simple seasoning to enhance the chicken and butter.
- 1 teaspoon paprika — adds mild color and a touch of smoky warmth.
- 1 tablespoon fresh parsley, chopped — adds fresh herbal brightness at the end.
Step-by-Step Instructions
- Preheat the oven to 375°F (190°C) and prepare a baking dish with a light coating of butter or oil. This prevents sticking and helps the butter mixture coat the pan.
- Melt the butter in a small bowl or microwave-safe cup, about 20 to 30 seconds, then stir until smooth. Be careful when removing from the microwave as the container may be hot.
- Add the minced garlic, salt, pepper, and paprika to the melted butter, and stir until evenly combined. Taste a small dab on a spoon to confirm seasoning, remembering flavors mellow during baking.
- Place the chicken breasts in the prepared baking dish in a single layer. Spread them out so they do not overlap for even cooking.
- Pour the garlic butter mixture over the chicken breasts, using a spoon or brush to baste. Ensure each breast is coated to lock in moisture and flavor. For a slightly deeper flavor, spoon some of the butter over midway through baking. Leftover garlic butter works beautifully tossed with pasta.
- Bake uncovered for 25 to 30 minutes or until the chicken is cooked through. Aim for an internal temperature of 165°F (74°C) measured at the thickest part. If breasts are very thick, add a few extra minutes and check the temperature.
- Remove from the oven, garnish with chopped parsley, and let rest for 5 minutes before slicing. Resting helps the juices redistribute for a moister bite. Serve the sliced chicken over buttery pasta for a hearty meal.
Recipe Details
- Prep Time: 10 minutes
- Cook Time: 25 to 30 minutes
- Total Time: 35 to 40 minutes
- Servings: 4
- Calories (approximate): 390 per serving
Tips, Storage & Variations
Tips
- Pound thicker breasts to an even thickness for more uniform cooking.
- Use fresh garlic for the best aroma; pre-minced garlic works in a pinch but will be less vibrant.
- Spoon pan juices over the chicken when serving to keep slices moist. Try similar garlic butter ideas with steak for a richer meal.
Storage
- Refrigerate cooked chicken in an airtight container for up to 3 to 4 days. Reheat gently in the oven at 300°F until warmed through to avoid drying.
- Store the garlic butter sauce in a small sealed container and use within 3 days.
Freezing
- Freeze cooked chicken in a freezer-safe container or bag for up to 3 months. Thaw overnight in the refrigerator before reheating.
- For best texture, freeze the chicken without garnish and add fresh parsley after reheating.
Variations using only the listed ingredients
- Garlic-forward: Increase the minced garlic to 6 cloves for a stronger garlic punch.
- Smokier color: Add an extra 1/2 teaspoon paprika to deepen the color and mild smokiness.
- Extra buttery finish: Melt an additional tablespoon of butter and baste the chicken right after it comes out of the oven for a glossier finish.

FAQ
How can I tell when the chicken is done?
Use an instant-read thermometer and cook until the thickest part reaches 165°F (74°C). The juices should run clear.Can I use salted butter instead of unsalted?
Yes, but reduce added salt to avoid over-seasoning; taste the butter mixture before pouring.Is it necessary to let the chicken rest?
Yes, resting 5 minutes helps the juices redistribute so slices stay moist.Can I double the recipe for more servings?
Yes, double all ingredients and use a larger baking dish to keep breasts in a single layer.What if my chicken breasts are different sizes?
Adjust baking time slightly and use a thermometer to ensure the thickest piece reaches 165°F (74°C).
People Also Ask (PAA)
Can I marinate the chicken in the garlic butter before baking?
Yes, marinate for up to 30 minutes in the refrigerator for extra flavor, then bake as directed.Will this recipe work with bone-in chicken?
You can use bone-in pieces, but increase the bake time and check doneness with a thermometer.Can I use dried parsley instead of fresh?
Dried parsley can be used, but add it sparingly and consider adding it early so it rehydrates.What side dishes pair well with garlic butter chicken?
Roasted vegetables, a simple salad, or buttery pasta are classic pairings.Can I make this in a skillet instead of baking?
Yes, sear on the stovetop in the garlic butter and finish in the oven for even cooking.How do I prevent the garlic from burning?
Mix the garlic into melted butter and avoid extremely high oven temperatures; baking at 375°F prevents burning.Can I use pasteurized butter substitutes?
Clarified butter or ghee will work but will have a slightly different flavor.Is this recipe suitable for meal prep?
Yes, it reheats well and keeps for several days in the refrigerator.
Conclusion
This Garlic Butter Baked Chicken Breast is an easy, flavorful recipe that produces juicy, aromatic chicken with minimal fuss. If you want another take on the same dish from a different source, see Garlic Butter Baked Chicken Breast – Primavera Kitchen for inspiration. For a slightly different version and serving ideas, check Garlic Butter Baked Chicken Breasts Recipe – Little Spice Jar. Try this at home, share your results, and enjoy a cozy dinner with buttery garlic flavor.
PrintGarlic Butter Baked Chicken Breast
A simple, satisfying weeknight meal featuring tender chicken breasts with a rich garlic butter coating.
- Prep Time: 10 minutes
- Cook Time: 30 minutes
- Total Time: 40 minutes
- Yield: 4 servings 1x
- Category: Main Course
- Method: Baking
- Cuisine: American
- Diet: Gluten-Free
Ingredients
- 4 chicken breasts, boneless and skinless
- 4 tablespoons butter
- 4 cloves garlic, minced
- Salt and pepper to taste
- 1 teaspoon paprika
- 1 tablespoon fresh parsley, chopped
Instructions
- Preheat the oven to 375°F (190°C) and prepare a baking dish with a light coating of butter or oil.
- Melt the butter in a small bowl or microwave-safe cup for about 20 to 30 seconds, then stir until smooth.
- Add the minced garlic, salt, pepper, and paprika to the melted butter, and stir until evenly combined.
- Place the chicken breasts in the prepared baking dish in a single layer.
- Pour the garlic butter mixture over the chicken breasts, ensuring each one is coated.
- Bake uncovered for 25 to 30 minutes or until the chicken is cooked through, aiming for an internal temperature of 165°F (74°C).
- Remove from the oven, garnish with chopped parsley, and let rest for 5 minutes before slicing.
Notes
For extra flavor, spoon pan juices over the chicken when serving. Refrigerate leftovers for up to 3-4 days.
Nutrition
- Serving Size: 1 serving
- Calories: 390
- Sugar: 0g
- Sodium: 300mg
- Fat: 25g
- Saturated Fat: 15g
- Unsaturated Fat: 8g
- Trans Fat: 1g
- Carbohydrates: 1g
- Fiber: 0g
- Protein: 40g
- Cholesterol: 120mg
Keywords: chicken, garlic butter, baked chicken, weeknight meal, easy recipe