
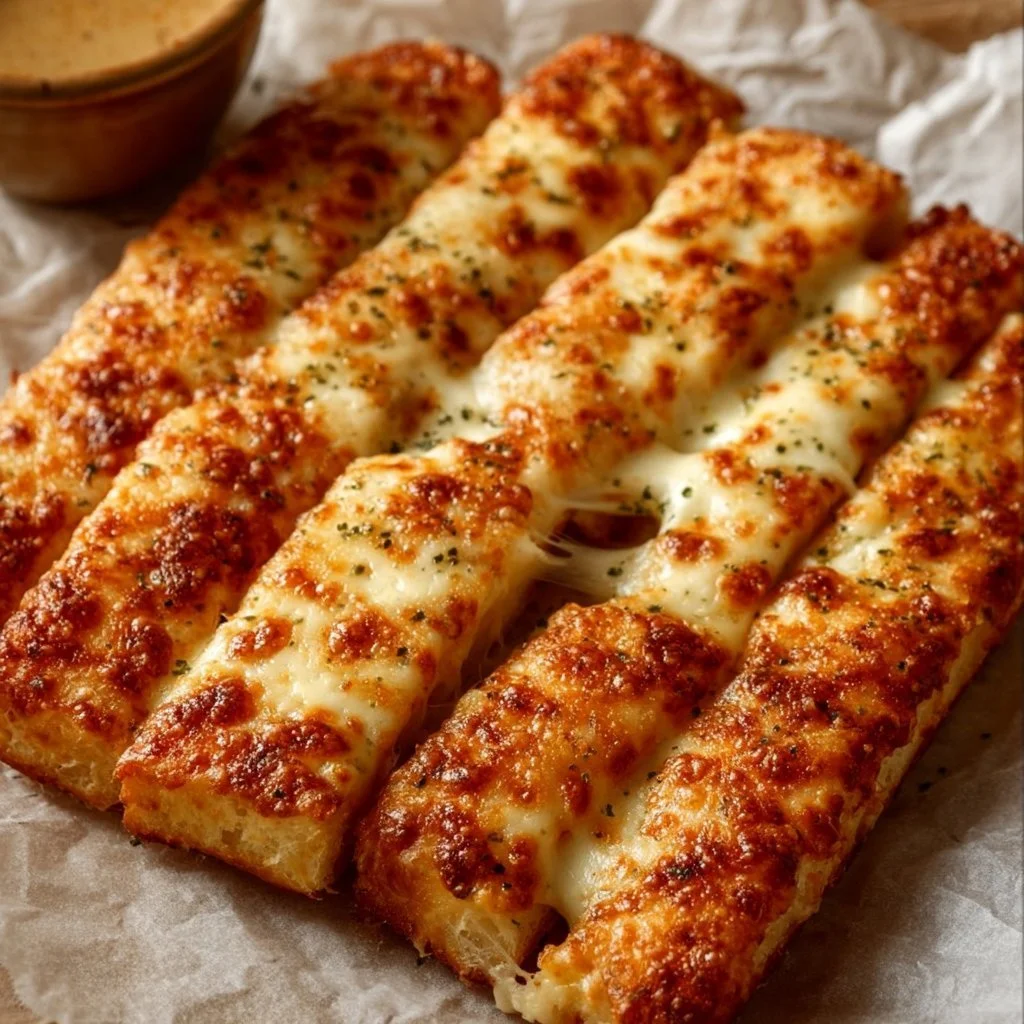
Homemade Cheesy Breadsticks: A Family Favorite
There’s something truly comforting about the aroma of freshly baked breadsticks wafting through the house—it’s like a warm hug for the soul. These homemade cheesy breadsticks are not just delicious; they’re incredibly easy to make, making them a perfect weeknight treat or crowd-pleaser for your next gathering. Imagine pulling a tray of golden, gooey cheese-topped delights from the oven, their crispy edges giving way to a fluffy interior, with that irresistible melty cheese stretching from each bite. Whether dipped in marinara sauce or savored on their own, these breadsticks are sure to bring smiles to your family’s faces. So, gather your ingredients and let’s create some magic together!
Understanding this Recipe
Homemade cheesy breadsticks have roots in Italian cuisine, where bread is not just a side dish but a fundamental part of every meal. The combination of dough and cheese creates a harmony of textures and flavors that enhances any dining experience. This recipe shines in its simplicity: made with basic ingredients like flour, cheese, and butter, it invites you to explore the magic of home baking. Picture this—a gathering of friends with laughter filling the air, accompanied by the delightful crunch of these breadsticks as everyone enjoys them fresh from the oven.
To enhance versatility, you can easily adapt these breadsticks to different cooking methods. Oven-baking is the traditional approach that yields a perfectly crispy exterior while keeping the inside fluffy. However, using an air fryer can cut the cooking time significantly and infuse the breadsticks with a delightful, crispy texture without the need for excessive oil. You can serve them as an appetizer, a side for your main dish, or even as a snack during movie night. Fun fact: these cheesy delights are perfect for customizing with herbs, spices, or different cheese varieties!
Why You’ll Love This Recipe
There are plenty of reasons why these homemade cheesy breadsticks will quickly become a favorite in your kitchen.
- Ease of Preparation: With just a few simple steps and minimal ingredients, making these breadsticks doesn’t feel like a chore. Kids can join in the fun, kneading the dough and sprinkling cheese!
- Flavor Complexity: The combination of melted cheese with the warm, comforting bread provides a flavor explosion that’s hard to resist. You can even experiment by adding different cheeses or herbs to elevate the taste.
- Family-Friendly: These breadsticks are a hit with kids, bringing joy and satisfaction. They’re great not only as a side dish but also a fun snack that can be enjoyed while watching a favorite family movie.
- Budget-Friendly: With ingredients that you likely already have in your pantry, this recipe is economical without sacrificing flavor. Plus, you can adjust the recipe easily based on what you have on hand.
Your Guide to Making Homemade Cheesy Breadsticks at Home
Making these cheesy breadsticks is an enjoyable experience that doesn’t take much time. You’ll need a few key items like mixing bowls, a baking sheet, and a bit of patience to let the dough rise. The entire process usually takes about 1 hour from start to finish, including mixing, rising, and baking.
Ingredients
- 2 cups all-purpose flour (provides structure; you can substitute gluten-free flour if needed)
- 1 cup shredded mozzarella cheese (offers meltiness; try a blend of cheeses for different flavors)
- 1 packet (2 ¼ tsp) instant yeast (helps the dough rise)
- 1 tsp salt (enhances flavor; can reduce for dietary reasons)
- 1 tsp sugar (activates yeast; optional for those avoiding sugar)
- ¾ cup warm water (activates yeast; make sure it’s not too hot)
- 2 tbsp melted butter (adds richness; can use olive oil for a healthier option)
- Additional cheese for topping (choose your favorite like cheddar or parmesan)
Directions
Mix the Dough: In a large mixing bowl, combine the flour, instant yeast, salt, and sugar. Gradually add the warm water and melted butter, mixing until you form a soft dough. The smell of yeast will fill the air as it activates.
Knead the Dough: Transfer the dough onto a lightly floured surface and knead for about 5-7 minutes until smooth and elastic. You should feel the dough become soft and pliable; it will be slightly tacky but not sticky.
Let It Rise: Place the dough in a lightly greased bowl, cover it with a damp cloth, and let it rise for about 30 minutes, or until doubled in size. You’ll see it puffing up, and soon, a warm aroma will entice you from the kitchen.
Shape the Breadsticks: Once risen, punch down the dough and roll it out into a rectangle about ¾ inch thick. Cut the dough into strips using a sharp knife or pizza cutter, then shape them into breadstick forms.
Add Cheese and Bake: Place the breadsticks on a greased baking sheet, sprinkle generously with mozzarella and your chosen toppings. They should be aromatic and ready to go into the oven at this point. Bake in a preheated oven at 375°F (190°C) for 15-20 minutes, or until golden brown.
Cool and Serve: Remove from the oven and let the breadsticks cool slightly. The cheese will be bubbling and fragrant, creating a visual feast that you’ll be eager to dive into.
Enjoy with Dips: They are perfect on their own but can also be served with marinara sauce or garlic butter for dipping. Your mouth will water at the sight of these cheesy, golden delights ready to be devoured!
Serving Ideas for Homemade Cheesy Breadsticks
These cheesy breadsticks are versatile and can be served alongside many dishes. They pair beautifully with a hot bowl of marinara or your favorite pasta dish, offering a delightful contrast of textures. You might even enjoy them alongside a fresh salad, where their rich cheesiness balances a light vinaigrette. For a cozy movie night at home, serve them with a warm cheese dip to enhance that cheesy goodness even further. Pairing them with a chilled glass of soda or iced tea can elevate your snack game, making for a perfect relaxing evening.
Pro Tips for the Best Cheesy Breadsticks
Success in the kitchen often hinges on technique, and the same goes for these breadsticks.
- Ingredient Swaps: You can use any combination of cheeses—think sharp cheddar or pepper jack for an extra kick. Play around with flavors until you find your favorite blend!
- Spice Adjustments: For added flavor, sprinkle garlic powder, dried oregano, or red pepper flakes on top before baking.
- Equipment Advice: If you have a pizza stone, using it in the oven can help achieve an extra crispy crust. Preheat the stone as the oven warms up.
- Storage Tips: Keep leftover breadsticks in an airtight container to maintain freshness. They can last for up to three days this way.
- Mistakes to Avoid: Make sure your water temperature is warm but not hot; otherwise, it will kill the yeast. Avoid over-kneading, which can lead to dense breadsticks.
Variations & Add-Ins
These cheesy breadsticks can be a blank canvas for your culinary creativity! For a flavorful twist, consider:
- Herb-Infused: Mix in fresh herbs like rosemary or thyme into the dough for a fragrant touch.
- Stuffed Versions: Create a cheesy filling by placing a small chunk of cheese inside each breadstick before rolling it out.
- Spicy Kick: Incorporate jalapeños or spicy pepper flakes into the dough for an exciting heat that pairs wonderfully with the cheese.
Kid-Friendly Version
To make these cheesy breadsticks more appealing to kids, make them a fun activity. For example, let them shape their own breadsticks or add fun toppings like mini pepperoni or colorful bell pepper slices. This will not only keep them engaged in the kitchen but also allow them to personalize their own snack.
Storing and Reheating Tips
These homemade cheesy breadsticks are best enjoyed fresh but can be stored properly for later enjoyment. If you have leftovers, allow them to cool completely before placing them in an airtight container or resealable plastic bag. They can generally last in the fridge for up to three days but are best when eaten sooner. For the best taste and texture, store them vertically to keep their shape.
When it comes to reheating, the oven is your best friend. Preheat your oven to 350°F (175°C), then wrap the breadsticks in aluminum foil to prevent drying out, and bake for about 10 minutes. If you’re short on time, the microwave can work—just heat them in short increments of 15-20 seconds to prevent them from becoming tough. Freezing is also a great option if you wish to store them longer; simply wrap them tightly in plastic wrap and then aluminum foil. When you’re ready to enjoy them, allow them to thaw in the fridge overnight before reheating!
FAQs
Can I make the dough ahead of time?
Yes, you can prepare the dough in advance and store it in the refrigerator for up to 24 hours. Just allow it to come to room temperature before shaping it into breadsticks.
Can I use whole wheat flour?
Absolutely! Whole wheat flour can be used for a healthier version; just remember to adjust the water content slightly, as whole wheat flour tends to absorb more moisture.
How can I make these gluten-free?
You can substitute the all-purpose flour with a gluten-free flour blend designed for baking, ensuring you also adjust the liquid to get the right dough consistency.
What if my breadsticks aren’t rising?
If your dough isn’t rising, check the freshness of your yeast. Make sure your water isn’t too hot, as it can kill the yeast, preventing it from activating.
How can I store leftovers?
Store your leftovers in an airtight container in the fridge for up to three days. Heat them in the oven for the best results when you’re ready to enjoy them again.
Conclusion
Homemade cheesy breadsticks are a delightful addition to your culinary repertoire. They are incredibly easy to make, and their delicious flavor will warm your family’s hearts. Savor the golden crust and gooey cheese as you recreate this simple yet satisfying dish in your own kitchen. Try it tonight, and let me know how it turned out!
Homemade Cheesy Breadsticks

Delicious and easy-to-make cheesy breadsticks, perfect for any gathering or as a comforting snack.
- Prep Time: 15 minutes
- Cook Time: 20 minutes
- Total Time: 45 minutes
- Yield: 4 servings 1x
- Category: Appetizer
- Method: Baking
- Cuisine: Italian
- Diet: Vegetarian
Ingredients
- 2 cups all-purpose flour
- 1 cup shredded mozzarella cheese
- 1 packet (2 ¼ tsp) instant yeast
- 1 tsp salt
- 1 tsp sugar
- ¾ cup warm water
- 2 tbsp melted butter
- Additional cheese for topping
Instructions
- Mix the Dough: In a large mixing bowl, combine the flour, instant yeast, salt, and sugar. Gradually add the warm water and melted butter, mixing until a soft dough forms.
- Knead the Dough: Transfer the dough onto a lightly floured surface and knead for about 5-7 minutes until smooth and elastic.
- Let It Rise: Place the dough in a greased bowl, cover with a damp cloth, and let it rise for about 30 minutes, until doubled in size.
- Shape the Breadsticks: Punch down the dough, roll it out into a rectangle, and cut into strips to shape into breadsticks.
- Add Cheese and Bake: Place breadsticks on a greased baking sheet, sprinkle with cheese, and bake in a preheated oven at 375°F (190°C) for 15-20 minutes until golden brown.
- Cool and Serve: Remove from the oven, let cool slightly, and enjoy with dips like marinara sauce or garlic butter.
Notes
Experiment with different cheese blends or herbs for added flavor.
Nutrition
- Serving Size: 1 serving
- Calories: 350
- Sugar: 1g
- Sodium: 400mg
- Fat: 12g
- Saturated Fat: 6g
- Unsaturated Fat: 4g
- Trans Fat: 0g
- Carbohydrates: 45g
- Fiber: 2g
- Protein: 15g
- Cholesterol: 30mg
Keywords: cheesy breadsticks, appetizer, homemade, Italian, baking, comfort food, snacks