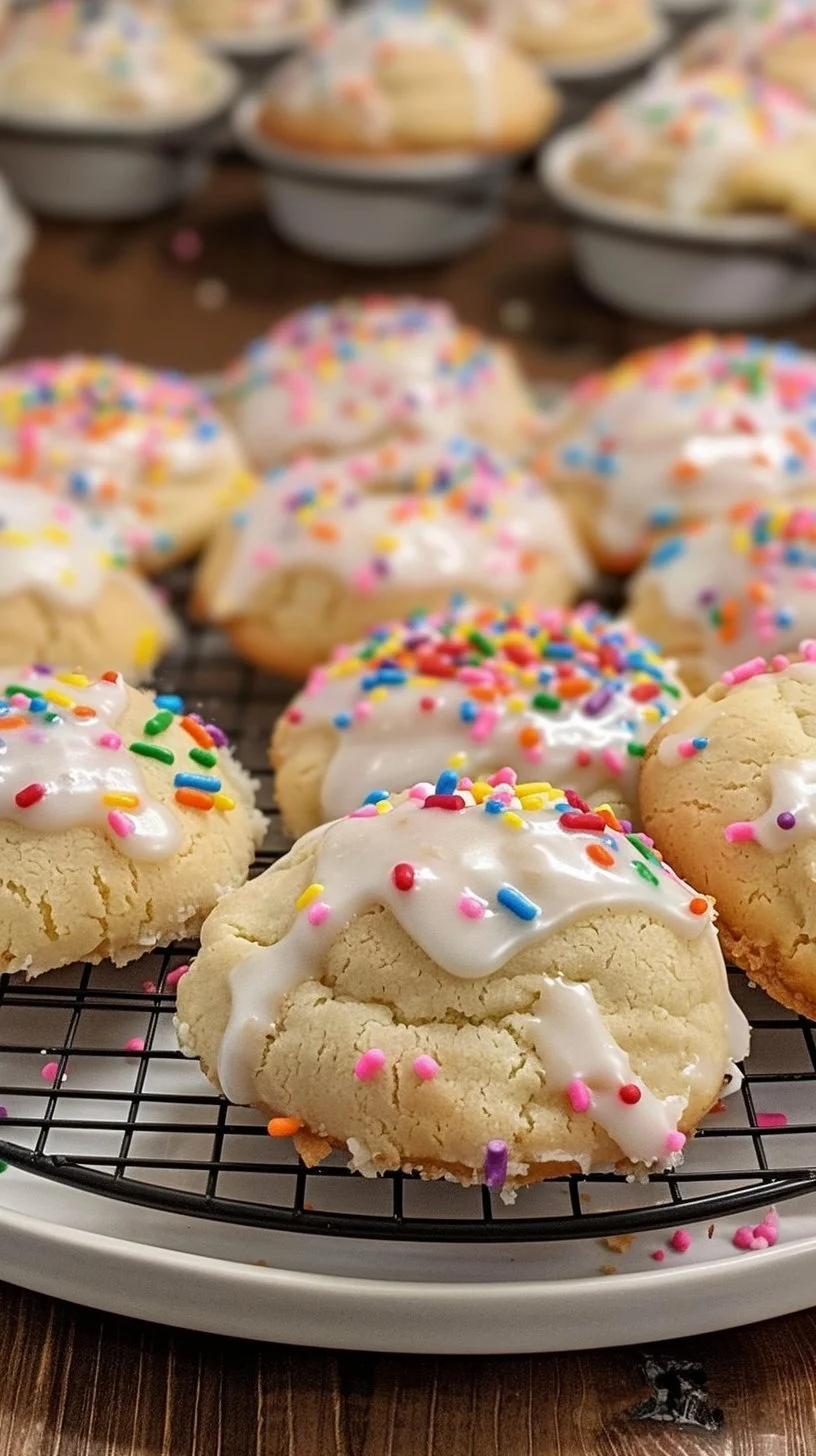

Easter Bunny Button Cookies
A batch of Easter Bunny Button Cookies brings a playful, nostalgic charm to any spring gathering. These soft, buttery cookies are lightly crisp at the edges and tender in the center, with a delicate vanilla aroma that fills the kitchen as they bake. The pastel buttons or candy-coated chocolates on top add a cheerful crunch and a pop of color, making them perfect for Easter baskets, classroom parties, or an afternoon tea. If you like a simple cookie base that can be dressed up for holidays, this recipe is a great fit and builds on a classic butter cookie technique similar to my take on a classic butter cookie base. The ease of shaping and decorating makes these ideal for baking with kids, and they store well for a few days without losing their soft texture.
Ingredients
1 cup unsalted butter, softened
Explanation: Softened butter helps create a light, tender cookie when creamed with sugar. Do not melt it.3/4 cup granulated sugar
Explanation: Provides sweetness and helps with browning and texture.1 large egg
Explanation: Binds the dough and adds moisture and structure.1 teaspoon vanilla extract
Explanation: Adds warm, sweet flavor that complements the buttery dough.2 1/2 cups all-purpose flour
Explanation: The main structure of the cookies. Measure by spooning into the cup and leveling for accuracy.1/2 teaspoon baking powder
Explanation: Gives a gentle lift so the cookies are tender, not flat.1/4 teaspoon salt
Explanation: Balances sweetness and enhances the other flavors.Assorted pastel-colored buttons or candy-coated chocolates for decoration
Explanation: Use small, flat candies to create the bunny button effect; press them gently into the dough before baking.Powdered sugar for dusting (optional)
Explanation: Adds a soft, festive finish when dusted lightly after baking.
Step-by-step Instructions
Preheat the oven to 350°F (175°C) and line a baking sheet with parchment paper.
Tip: Lining the sheet prevents sticking and makes cleanup easier.In a large bowl, cream together the softened butter and granulated sugar until light and fluffy.
Tip: Beat for about 2 to 3 minutes with an electric mixer for the best texture.Beat in the egg and vanilla extract until well combined.
Tip: Scrape the sides of the bowl once so everything mixes evenly.In a separate bowl, whisk together the flour, baking powder, and salt.
Gradually add the dry ingredients to the wet ingredients, mixing until a dough forms.
Tip: Mix just until combined to avoid a tough cookie.Roll the dough into 1-inch balls and place them on the baking sheet, spacing them about 2 inches apart.
Gently press five buttons onto the top of each dough ball.
Tip: Arrange them in any pattern you like for a playful look.Bake for 10 to 12 minutes, or until the edges are lightly golden.
Tip: Rotate the baking sheet halfway through baking for even color.Allow the cookies to cool on the sheet for 5 minutes before transferring them to a wire rack to cool completely.
Dust with powdered sugar before serving if desired.
For a slightly different texture or fun holiday twist, you can compare shaping and decorating tips with a chewy sugar cookie approach at my chewy sugar cookie guide.
Recipe Details
- Prep Time: 15 minutes
- Cook Time: 10 to 12 minutes per batch
- Total Time: 25 to 30 minutes (per batch)
- Servings: About 24 cookies
- Calories: Approximately 140 kcal per cookie
For tips on adjusting bake time or cookie thickness, see a comparison to other cookie recipes such as this chocolate chip cookie reference.
Tips, Storage & Variations
Tips
- Use room temperature butter for best creaming results.
- Weigh your flour or spoon and level for consistent texture.
- Press candies in gently so they do not sink completely during baking.
Storage
- Store cooled cookies in an airtight container at room temperature for up to 4 days.
- If the candies soften slightly over time, they still taste great.
Freezing
- Freeze unbaked dough balls on a tray until firm, then transfer to a freezer bag for up to 3 months. Bake from frozen, adding 1 to 2 extra minutes to the baking time.
- Fully baked cookies can be frozen in a single layer separated by parchment for up to 2 months.
Variations using only the existing ingredients
- More vanilla: Increase the vanilla to 1 1/2 teaspoons for a stronger vanilla note.
- Powdered finish: After cooling, dust with powdered sugar for a softer, sweeter finish.
- Button patterns: Vary the number and arrangement of buttons for playful designs or to indicate different flavors without changing ingredients.
For an alternate decorative idea with a richer look, try inspiration from other cookie styles at brown sugar pop tart cookies.

FAQ
How long will these cookies stay fresh?
They stay fresh in an airtight container at room temperature for up to 4 days.Can I use salted butter instead of unsalted butter?
Yes, but omit any extra salt and be aware the cookies will be slightly saltier.Do I have to chill the dough?
No, this recipe is designed to bake directly after shaping, though chilling will firm the dough if needed.What size should the buttons be?
Use small, flat candy-coated buttons that sit neatly on the dough ball without sliding off.Can I make these larger or smaller?
Yes, adjust baking time slightly: larger cookies will need a minute or two longer, smaller ones less time.
People Also Ask
Why did my cookies spread too much?
Overcreamed butter or too-warm dough can cause spreading. Chill briefly if your kitchen is warm.How do I prevent buttons from melting?
Press them gently into the dough and bake until edges are just golden to minimize melting.Can I double the recipe?
Yes, double all ingredient quantities and bake on multiple sheets as needed.Are these cookies good for gifting?
Yes, they make a colorful, portable gift when packed in a decorative tin or box.What oven rack should I use?
Use the middle rack for the most even baking.Can kids help make these?
Absolutely. Kids can roll balls and press on the buttons with supervision.Do these cookies need to cool before packing?
Yes, allow them to cool completely so decorations do not smear.Will powdered sugar make them soggy?
A light dusting after cooling will not make them soggy and adds a festive touch.
Conclusion
These Easter Bunny Button Cookies are a simple, joyful treat that combine a classic buttery cookie with colorful decorations that are perfect for spring celebrations. If you enjoy seeing different takes on this concept, you might like the version from Easter Bunny Button Cookies – Lord Byron’s Kitchen for comparison. For another charming bunny cookie idea and decorating tips, check out Easter Bunny Cookies – Like Mother, Like Daughter. I hope you enjoy baking and sharing these cheerful cookies with friends and family.
PrintEaster Bunny Button Cookies

Soft, buttery cookies with pastel candy buttons perfect for spring gatherings and Easter celebrations.
- Prep Time: 15 minutes
- Cook Time: 12 minutes
- Total Time: 30 minutes
- Yield: 24 cookies 1x
- Category: Dessert
- Method: Baking
- Cuisine: American
- Diet: Vegetarian
Ingredients
- 1 cup unsalted butter, softened
- 3/4 cup granulated sugar
- 1 large egg
- 1 teaspoon vanilla extract
- 2 1/2 cups all-purpose flour
- 1/2 teaspoon baking powder
- 1/4 teaspoon salt
- Assorted pastel-colored buttons or candy-coated chocolates for decoration
- Powdered sugar for dusting (optional)
Instructions
- Preheat the oven to 350°F (175°C) and line a baking sheet with parchment paper.
- Cream together the softened butter and granulated sugar until light and fluffy.
- Beat in the egg and vanilla extract until well combined.
- Whisk together the flour, baking powder, and salt in a separate bowl.
- Add the dry ingredients to the wet ingredients, mixing until a dough forms.
- Roll the dough into 1-inch balls and place them on the baking sheet, spacing them about 2 inches apart.
- Press five buttons onto the top of each dough ball.
- Bake for 10 to 12 minutes, or until the edges are lightly golden.
- Allow the cookies to cool on the sheet for 5 minutes before transferring them to a wire rack to cool completely.
- Dust with powdered sugar before serving if desired.
Notes
Store cooled cookies in an airtight container for up to 4 days. Freezing options are available for unbaked dough and fully baked cookies.
Nutrition
- Serving Size: 1 cookie
- Calories: 140
- Sugar: 9g
- Sodium: 150mg
- Fat: 7g
- Saturated Fat: 4g
- Unsaturated Fat: 2g
- Trans Fat: 0g
- Carbohydrates: 18g
- Fiber: 0g
- Protein: 1g
- Cholesterol: 30mg
Keywords: Easter cookies, bunny cookies, spring baking, festive cookies, family baking